Ranger RCI RHF-618 CB Radio Review
I’d been receiving email after email requesting I do a review on the new RCI Ranger RHF-618 so I finally shelled out the dough and brought one home. Truthfully I originally hadn’t planned on reviewing this radio because I thought it would just be a 2950DX inside a base radio case. After receiving the radio and testing it I can say I’m glad I listened to all the emails because this radio has quite a bit more going on than I expected. So without further eloquence let’s get down to business.
The radio arrived well packed in the box with lots of styrofoam and the box itself is the typical style with the string ties to keep the box lid closed. We quickly pulled out the radio, power cord and microphone and got it hooked up in the shack. The power cord is a 3 prong computer type power cord which you might use on your PC or monitor and as this is a home base radio the power cord plugs directly into your standard house socket.
The radio has it’s own internal power supply which turns the AC power into DC power for the radio to function. It’s a switching type power supply which makes this radio much lighter than older model base radios.
Out of the box this radio is small in size. Roughly the size of the Galaxy 2547 CB base station. It’s compact and is a far cry from the large cases of the 2980 or 2995DX base stations RCI also produces.
The radio comes with a SRA-158 type microphone that has been modified with up/down buttons on the side to let you change channels/frequencies without having to touch the radio. This is a nice function while driving and even in the home base environment it can be nice to use these buttons rather than having to spin the large knob.
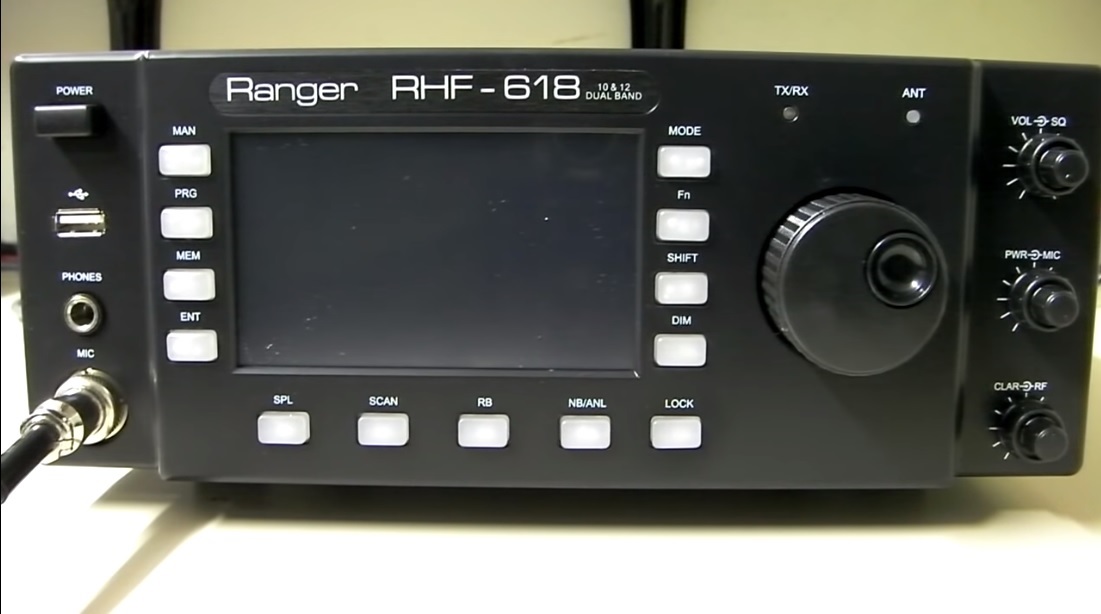
Looking at the left side of the front of the radio you’ll see the power button, push in to power on the radio and again to turn it off (spring loaded). Just below that is a USB port. The USB port is so you can connect to your computer and make changes to the radio display (add pictures) or make software updates if they are available. Unlike the Alpha Max export radio we reviewed that had USB programming abilities this radio can not be programmed via the USB, it is only for uploading photos to the display.

Below the USB port is a headphone jack if you want to listen to the radio through headphones (this disables the main speaker when the head phones are plugged in). Below that is the microphone plug which is a 6 pin plug for use with the included microphone. If you want to use a 4 pin microphone on this radio you’ll need to re-wire it or purchase a 4 pin to 6 pin adapter.
On the right side of the radio is your volume and squelch controls on a dual control (inside and outside knobs). Just underneath that is the RF power (variable power) and microphone gain controls also on a dual control. At the bottom is the clarifier and RF gain on a dual control as well.
Changing frequencies / channels is done using the large knob in the middle/right of the radio. This knob works much more like a ham radio control and is set up so it can be rotated quickly. The knob works well to speed through the frequencies with ease. The feel of the knob is a bit cheap compared to an Icom 718 or other ham radios that use these types of dials but overall it functioned well during testing and I didn’t run into any problems.
Just above the large knob is your TX/RX indicator led and an ANT led (antenna high SWR warning light) to warn you if your antenna isn’t working correctly. The SWR is also displayed on the screen menu which we will mention further on.
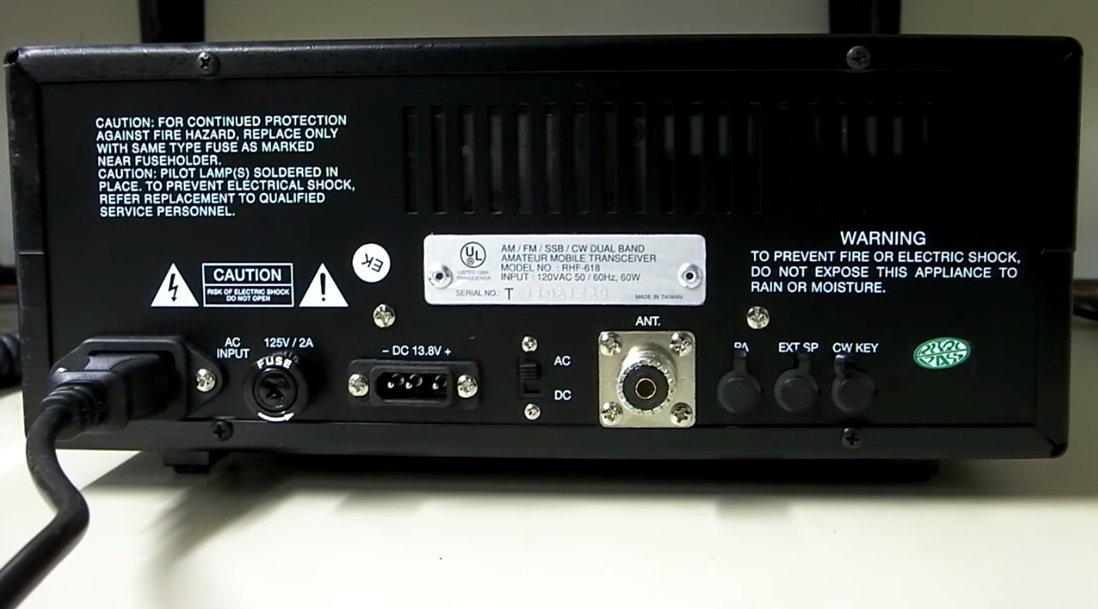
At the back of the radio you’ll see the antenna connection along with the fuse holder and the DC power plug. This radio can be powered directly with DC power (if you want to run it in a car) using a standard CB 3 pin power cord. There is an AC/DC switch on the back of the radio and this allows you to switch back and forth to whichever method you intend to use to power the radio. There are also PA (Public Address) and External Speaker Jacks at the back of the radio. There is a large vent area at the back of the case to allows for heat to escape from the inside section.
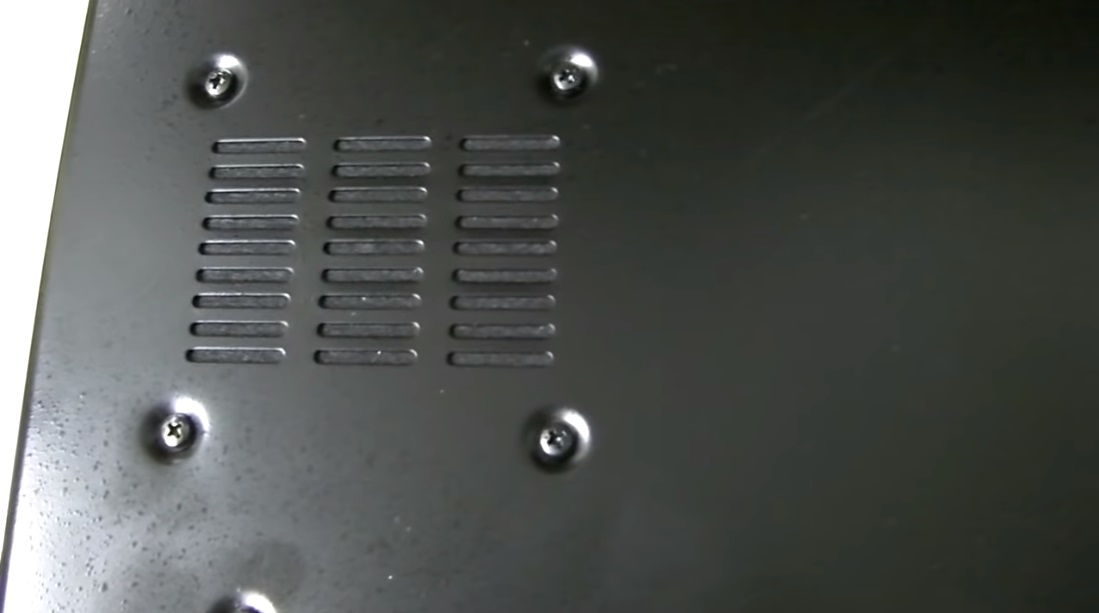
In the top view we showed of the radio you might have noticed a small section with slits on the top case. The radio’s internal speaker is mounted to the top of the radio case and so sound is projected upwards. I found the stock speaker worked well enough for loudness, however when turned up I did find some louder signals from stations with more bassy voices caused the top case to rattle a bit.
I’m sure everyone has been waiting for me to discuss the fancy screen in the middle of the radio. The screen on this radio is a touch screen. So in addition to using the large orange buttons that run around the screen perimeter you can also touch your finger directly to the screen to make your selections (please watch my video review to see this in action). This is a pretty cool feature and something we haven’t seen on an export radio previously. Since the buttons surrounding the screen provide the same functionality the feature is a little redundant, but nonetheless it’s fun to see something new.
The menu options are displayed in small boxes on the screen and touching them (or the labeled orange button will active that feature). There is however one exception.
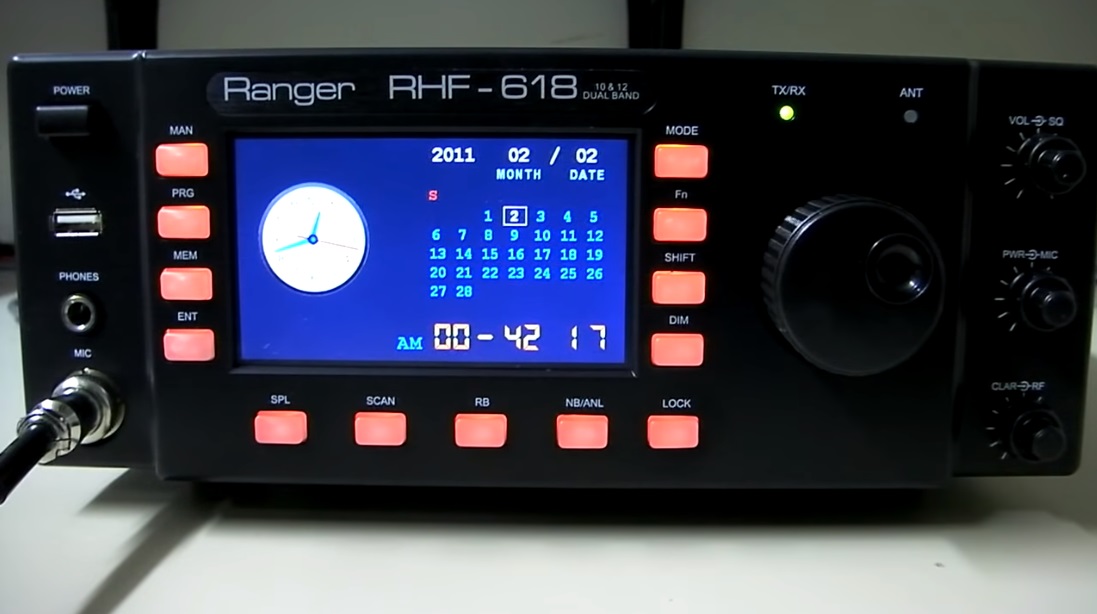
The clock on this radio (upper right section of the screen) has a menu feature that can be accessed by touching your finger directly on the clock. It will then pull up a screen where you can see an analog clock, and date with calendar. Pretty cool feature for anyone needing to keep track of what day it is (maybe you need to know the date as you log a contact in your log book).
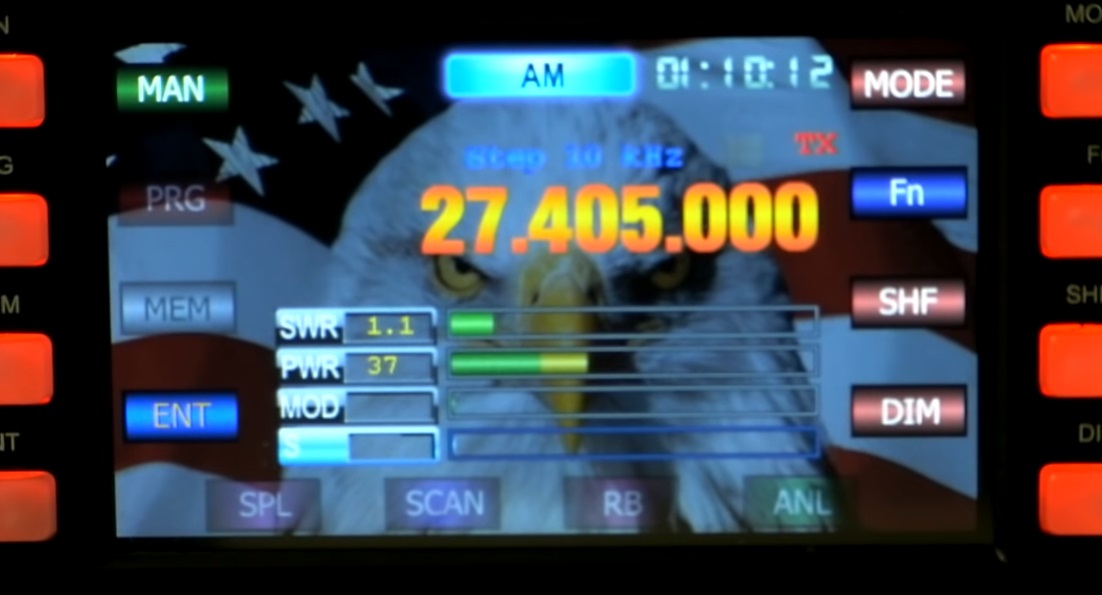
The display has the ability to show pictures in the background. Using the USB you can load your own photos to display as the background picture. You can then flip between the images and choose the background you’d like to display. Stock from the factory it comes with two options and you can see the second screen in the picture below. Note – some of the colors on the screen will switch as well when you toggle between the display options. I think I preferred the original eagle/flag in the background.
The screen has a digital meter which will display your SWR (standing wave ratio), Power output, Modulation, and S meter (receive signal strength). These meters work fairly well to show the relative levels but please be aware that they don’t display actual output numbers, etc. and instead display the percentages. For example on the power output bar it will show 77 which represents 77% of your max output not 77 watts. Modulation may hit 99% which mean you are at full modulation. The SWR scale was off and showed my SWR incorrectly (it was not 2.6 as shown in the picture). These scales are nice and pretty to look at but I still would have preferred if the power scale would have shown actual output wattage.
This radio is a 10/12 meter model which means out of the box it’s designed to be used on the ham frequencies by a licensed amateur radio operator. The radio can be converted using an E-chip so that it can transmit from 24-32Mhz. You can have the radio operate in a full frequency range mode or just a CB channels only mode.
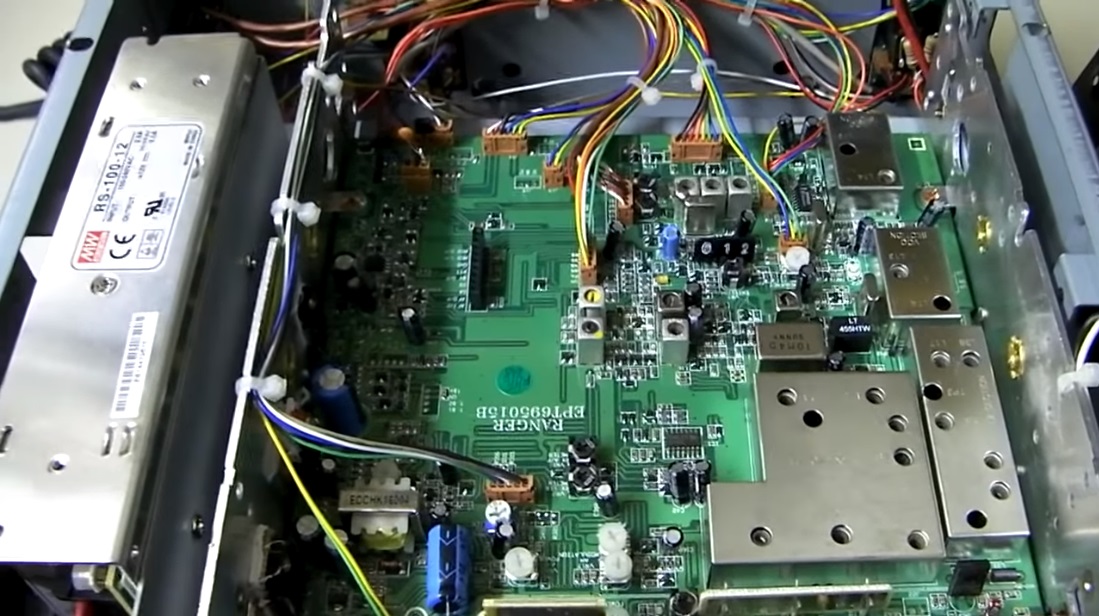
Conversion using an e-chip means you have to first get a hold of an e-chip. Many shops online sell the e-chip with the radio but in some cases you’ll only get one installed if you pay for the frequency conversion by the shop. Basically the e-chip is plugged into an open socket on the circuit board. In the picture below you’ll see the e-chip (chip wrapped in heat shrink tubing with purple/white/black wires) plugged into the front board. Installing the e-chip isn’t super difficult although it does require removing the top case of the radio (which voids your warranty as you have to break a sticker seal on the side). The e-chip isn’t sold by RCI or included with the radio from the factory.
Now there are a ton of functions on this radio and I think it might be a bit long in the tooth to explain every single function here so if you want to see every in and out of this radio I’d suggest watching my full You Tube video embedded below. Continuing on with the review under the video I’ll explain some of the stand out features of this radio and why it’s more than just a 2950DX in a box.
What makes this radio different?
People looking at the inside of this radio might say “That’s just a 2950DX inside a base station case!” and they would be correct. The inside of the radio is pretty much a 2950DX chassis and all the tuning points etc are the same so the radio receives and transmits and for all purposes behaves like a 2950DX (You can even see the standard heat sink inside the base case).
However the front screen and software features of this radio make it behave differently in some specific ways.
First, this radio has the ability to store memories much like the 2950DX however this radio can store 99 different frequencies compared to 16 on the standard 2950DX.
Secondly, this radio can memorize both the frequencies and the mode. On a standard 2950DX you’ll have to still turn the mode knob to the right mode (AM/LSB/USB) but this radio’s software does it for you and when you flip to the desired frequency you’re already on the correct mode.
This radio can scan much like the 2950DX but it’s much easier to set it up using the screen as it shows the upper and lower levels of the scan range but you can also determine the increments you’d like to scan in. It also supports the memory scan option of all 99 stored memory frequencies.
Split frequency operation is also easy with this radio and it displays the offset on the screen making it easy to see what the amount of offset is.
So while many of the features are very similar to the 2950DX this radio does behave differently and the ability to store both frequency and mode make this radio much easier to use in conjunction with memory channels.
Modulation, Output, Receive
I tested this radio straight out of the box and it wasn’t doing super impressive numbers. With a slight adjustment of the modulation circuit and ALC circuit this radio immediately came to life and was swinging to 40 watts on AM and SSB. Modulation on AM on this model is acceptable and on SSB I got back great reports on the audio (which is usually the norm with the CPU controlled SSB RCI models). The output on these seems to bit stronger than the original versions 2950DX (something I’ve found with the newer 2950DX as well) and they tune up quite easily.
Receive on this radio is a little noisy but by turning the RF gain down slightly I was able to cut out much of the noise without reducing the incoming station signals. Over the years I’ve found this to work with the 2950/70 series and it’s a good way to reduce some of the noise without really effecting the receive. The receivers on these radios are always a bit noisier than some others so using the RF gain works well.
I usually give most exports a good test on 10 meters even if they aren’t really designed to be used by ham operators but in using this radio I truly found it to be more ham friendly than many other exports I’ve used in the past. No, I don’t think ham radio operators will be trading in their HF radios for it but in spending a full weekend talking 10 meter DX on this radio it really seemed easy to use and the reports I got back were great. I made contact with the DX expedition in the Kiribati islands (T32C) using this radio (barefoot) which was a very cool experience and quite a good distance contact.
Overall using the radio was a pleasure, my only concerns would be the knob which as mentioned doesn’t seem as robust as some HF ham radios, and the menu buttons were a little sticky in their operation although most of the time I opted not to use them and just used the touch screen.
Summary
This radio is not going to be for everyone. Most people I have talked to have either loved it or hated it based on looks alone. While the display and touch screen might not be your thing, the operation of this radio is quite good and it has some options you won’t find on the standard 2950DX aside from the fact that this radio has it’s own power supply..
The build quality seems a little cheap compared to the 2995DX but it’s also a smaller more compact radio. Long term I don’t know how the construction will hold up but I didn’t run into any problems during testing.
The biggest factor in deciding to own one of these radios is undoubtably the price. They are expensive radios and retail for around $500. That’s a lot of money to spend on a export radio even with the touch screen and other features. For those who are on the fence the price might be too much to rationalize but I’m sure for many they’ll look at this new radio and say “why not” and will give it a try.
The radio was easy to operate, worked well during testing and had good transmit and receive. It’s compact and has some new features to set it apart from the rest of the RCI line. It had good frequency stability just like the other radios in the 29XX series. Even though the RHF-618 is a interesting radio I think the 2995DX will continue to be the big radio of choice in the upper price range due to it’s high output wattage and similar features. Many people will have a hard time accepting the RHF-618 as a legitimate radio and not just a gimmick, but beyond the skepticism I’ve talked to some happy owners of this new radio and from testing it first hand I can say it’s definitely more than just a 2950DX in a base case.
ADDITIONAL PICTURES