Adding talkback to your CB radio – an easy modification for beginners
| When you are talking on your stock CB radio you often will hear people tell you that you aren’t loud enough, or you are too loud and need to turn down the mic gain on your radio. Maybe you run a echo mic and people are telling you that your microphone has too much echo effect and needs to be adjusted.
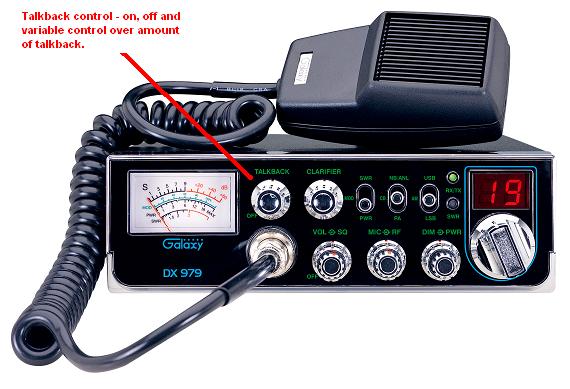
Well in most cases without talkback in your radio you will have no way to tell what you actually sound like. Talkback is a function that comes available on many export radios and a few CB radios. Simply put it allows you to hear your own voice through the CB speaker when you are transmitting. This allows you to know first hand what your outgoing audio sounds like and you can make adjustments accordingly. If you like to use an echo when talking on the CB than having talkback is a must so you can make adjustments. As mentioned there are many radios these days that come with factory talkback installed and it can be turned on or off with a flick of a switch or a turn of a knob. Many radios such as the Galaxy 979 below have a variable talkback control so you can adjust the amount of talkback coming through the speaker. This is a good feature to have, especially when running a power mic because if you are experiencing feedback you can use the variable control to lower the level of feedback or eliminate it completely.
So what do you do if you are one of the millions of people that have a CB radio without talkback? Add talkback to it yourself. There is a simple modification that works on about 75% of all CB radios. For pretty much any Cobra or Uniden that has an external speaker jack and PA jack you’ll be able to perform this simple modification. We will give you the step by step instructions below. 1) The first thing you will need to do is see if your radio has both a External Speaker Jack and a PA jack on the back. Often these will be abbreviated as (PA) and (Ext.).
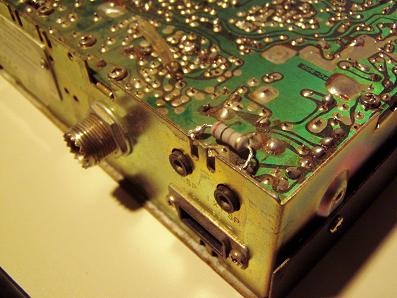
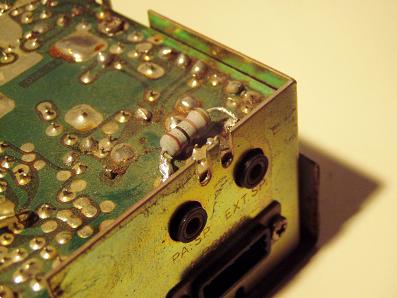
2) If your radio has both of these congratulations! You should be able to do the simple talkback modification. Now what you’ll need for parts. -a 100 ohm 1 watt resistor -a soldering iron and some electrical solder 3) Remove the top cover of your radio (the side that does not have the speaker on it). Once you remove the cover make sure you are looking at the solder side of your radio board (it will be green or orange and will have all of the solder traces running along it). 4) Look towards the back of the radio and locate the PA and Ext speaker jacks. Now look at the board for the radio and determine where both items have solder points. (See the picture below). 5) Cut your resistor so that each leg of the resistor will reach to the solder points for the PA jack and Ext speaker jack.
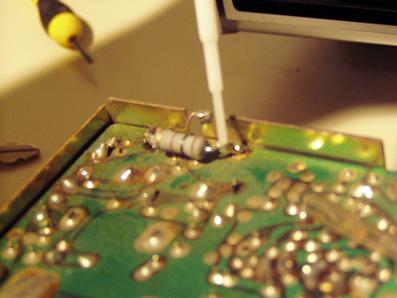
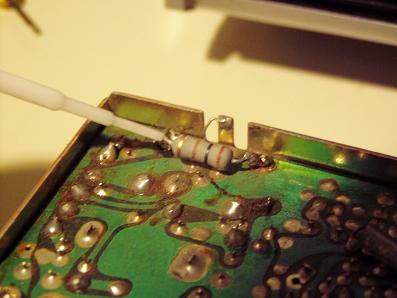
6) Now your are ready to solder in your resistor. Heat the existing solder for one of the jacks until it turns soft and then while it’s soft insert the end of your resistor into the soft solder and let it cool. Once it cools make sure the resistor is held firmly in place. Repeat for the other side.
7) When you are done you should now have a resistor that is bridging the two jack solder points on the solder side of the radio’s board. Replace your covers and hook up the radio and try transmitting. You should hear your voice through the speaker now!
A couple of things to remember. When putting in your resistor make sure it is solidly in place and will not come loose, a loose piece inside a radio can cause damage to the radio. Also make sure that the resistor legs (which are metal) are not touching any other metal points or traces on the board. Make sure you install your resistor low enough to the board so that your radio covers won’t push on the resistor. And the last thing to remember is that having talkback can cause feedback – it’s best to keep your microphone away from the speaker area of the radio when talking. If you hold your microphone directly under the speaker you will get feedback (go ahead and try and you’ll see). If the feedback is really bad you may need to turn your microphone gain down when talking to get the feedback to go away. In some cases there are radios that will have feedback no matter what you do and in those cases it’s best to just remove the modification. Now – a couple of other ways to add other functions to this modification. * If you want to have a on/off switch for your talkback you can add a toggle switch or even a simple plastic switch to this mod. To do so – run a wire from each solder point for each jack to the switch, one to the on side and one to the off side of the switch BUT you will need to place your resistor in-line at one of the points otherwise the talkback will be too loud and won’t work properly. * If you want variable talkback you can use a potentiometer. Basically you would install it the same as the on/off switch above with the resistor in-line. A potentiometer will allow you to have variable control over your talkback. The ones that work the best are old knobs from other radios because they have the right levels of resistance for this mod. You can also install the variable talkback in your RF gain knob if you like. Just cut the wires going to the RF gain and solder then together. Then run a wire from each jack’s solder point to the places on the RF gain knob where the wires you just cut ran to. It’s optional to add the resistor in line if you do this, but to prevent feedback it always helps to add the resistor. Hopefully you’ll be able to do this easy modification and will enjoy all the benefits of having talkback installed in your radio. It’s a cheap and very easy modification and is worth doing. You don’t need to be a pro – and as many experts will surely point out, the soldering in my pictures is poor quality at best…but it works and anyone can do it! |

