CRE 8900 10 Meter SSB Export Review
Updated 5/20/2012
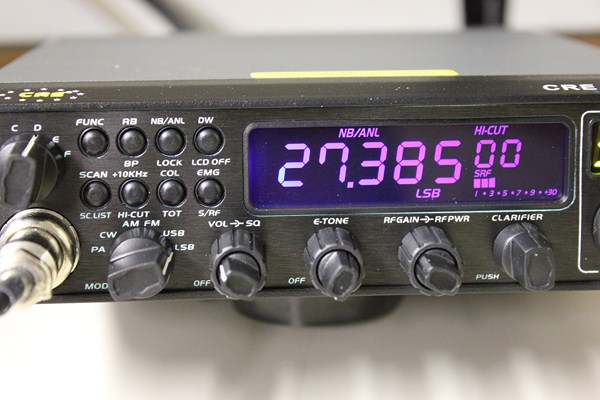
The CRE 8900 is a brand new radio currently being marketed and sold in Europe by Univercom (France). The radio chassis is new, and while some of the features and the layout of the board are reminiscent of the Anytone AT-5555/CRT6900/Alpha Max AM-1000, this radio is definitely a whole new animal. We’ll try to cover as much as we can in the written review but we’ve also made a couple of videos to accompany this review to show all of the cool features and functions in use.
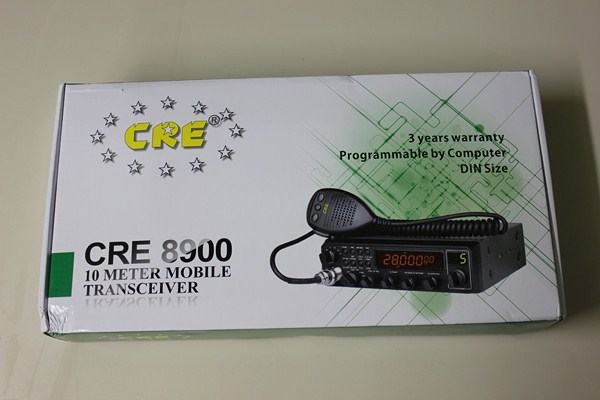
First things first, let’s show you the box the radio comes in. Three things are called out on the front: 1) The radio comes with a three-year warranty. 2) The radio is programmable by computer. 3) The radio is DIN size (DIN means it will fit in a standard stereo slot in your dash).
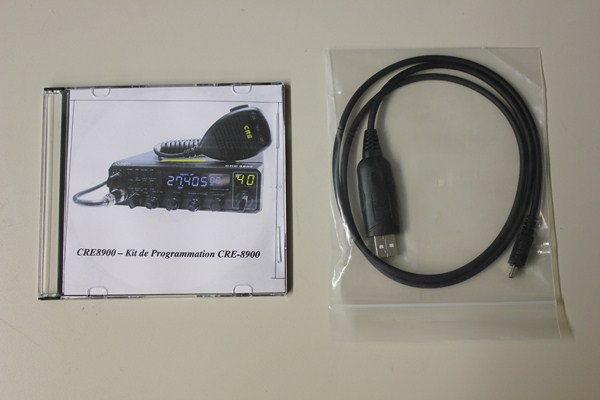
The CRE 8900 is software-programmable and we’ve done a full video to show how this works (see bottom of this review). The software disc and connection cable are sold separately and they aren’t required for the radio to operate, but there are some really cool custom programming and adjustments you can do using the software. If you’re going to buy this radio then make sure to spend the extra few bucks on the software/cable so you can really take full advantage of the radio’s capabilities.
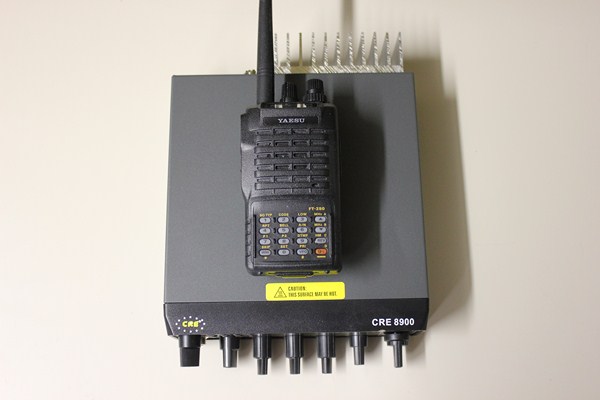
Now it’s time to really dive into what makes this radio so different in the current export market. The DIN size. This radio is one of the smallest SSB dual final export radios you’ve even seen. At 6.5″ wide x 9.25″ long x 2″ high, this radio is tiny. My RCI-2950DX seems absurdly large when placed next to the CRE 8900 and for those of you who have been searching for a small SSB radio for newer cars you might just have hit the jackpot.
The radio comes with its own mounting bracket, however, it doesn’t come with a DIN mounting bracket for in-dash installation (Univercom is currently working on optional DIN mounting bracket). Even though the radio is small it has a large heatsink (larger than the RCI-2950DX) to dissipate any heat from the final transistors. Some people might worry that the small size of the radio might make the controls difficult to use, but in our testing and daily use for a month I didn’t find that to be the case at all.
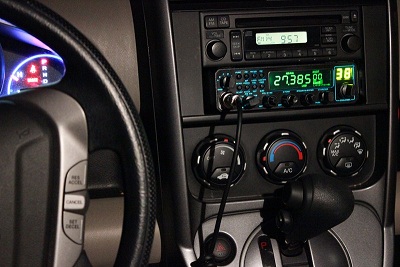
Pictured above is an actual in-dash install in a Honda Element. The Honda Element has an open single DIN space below the stock stereo and the radio easily fit into the slot. The radio is actually narrower than the stock stereo faceplate so there are some small gaps on either side, but all in all the install looks modern and fits well with the style of the vehicle. The radio actually was able to attach to the existing radio for the bracket using the thumbscrew locations. The radio is very solidly mounted and this might actually help reduce the likelihood of theft compared to a radio mounted from an exposed bracket someplace in the vehicle.
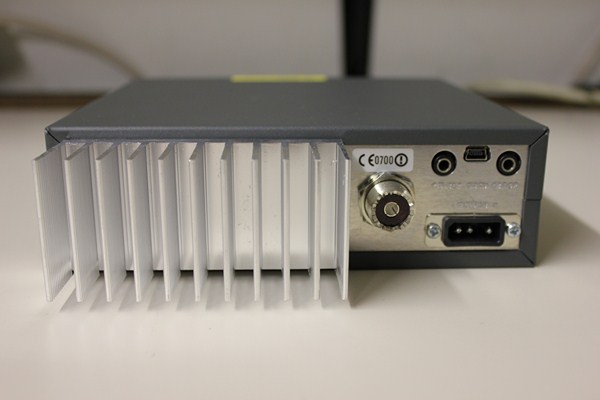
Looking at the back of the radio, you’ll notice the large heatsink, antenna so-239 connection, 3 pin standard power cord and input jacks for CW key and EXT Speaker. What you may not recognize is the USB jack on the back of the radio where you can connect your data cable to program the radio directly from your computer.
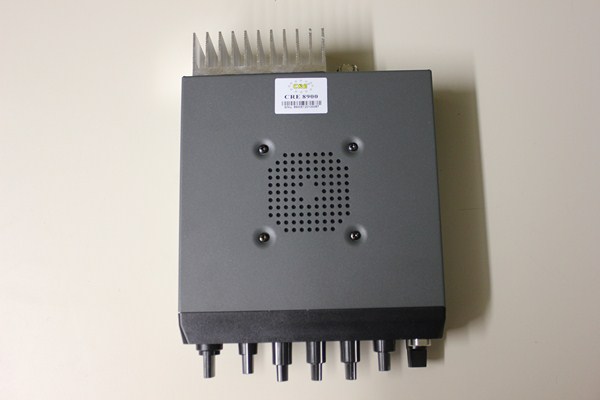
Since the radio is small in size, so is the internal speaker. While it provides adequate sound volume in a base setting I found that at highway speeds in a noisy vehicle an external speaker was useful in providing better sound than the stock speaker.
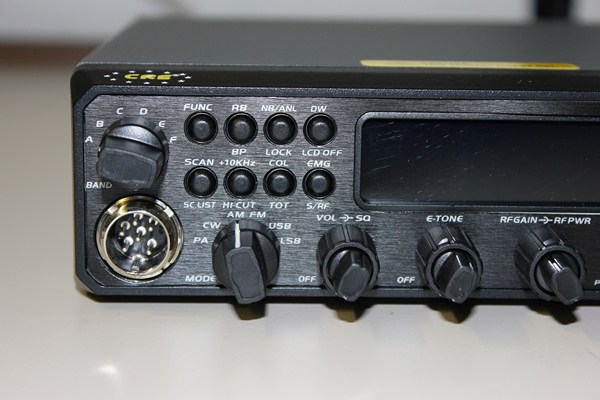
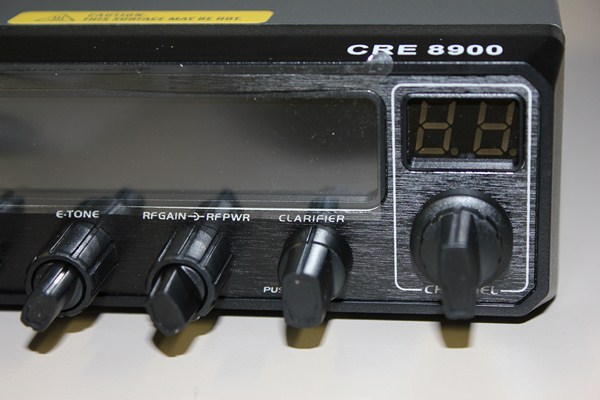
The styling of the radio is a black face with black knobs and grey covers. It looks modern and for those of you who no longer yearn for chrome on everything you’ll find the radio quite pleasing to the eye. I will mention that the faceplate itself has a nice textured look to it but the one on my test radio was coming off slightly (possibly due to some cold weather) and a little more adhesive on the backing from the factory might be nice. Nothing a quick drop of super glue won’t fix though.
The radio has 5 control knobs and some of them are dual pots so they serve two functions.
Band Selector – To select the “range’ of frequencies (A,B,C,D,E,F) customizable with the software
Mode Selector – AM, FM, USB, LSB, CW, PA
Volume/Squelch – Volume also turns the radio on/off
E-Tone – Inside control is for amount of echo, outside control is for amount of delay
RF Gain/RF Power – Both controls are variable and variable power works in all modes
Clarifier – Can be set up in three different ways (controls RX frequency, TX frequency or TX/RX), this also has a push option which allows you to pick the tuning steps the clarifier controls.
Channel Selector – Allows you to flip through the 40 frequency slots (or 60 if programmed)
There are also 8 buttons on the face of the radio, 7 of which are dual use (meaning each button serves two different functions). The “FUNC” (function) buttons allows you to access the secondary feature for each button.
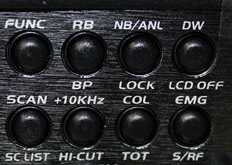
RB – Roger Beep
BP (secondary) – Audible beep when any button or control is changed
NB/ANL – Noise Blank/Automatic Noise Limiter
Lock (secondary) – Locks out all functions except for mode control, band control and PTT
DW – Dual Watch function for monitoring two frequencies
LCD OFF (secondary) – Turns off LCD screen
Scan – Enables scan of frequencies
SC List (secondary) – Allows you to exempt certain frequencies from being scanned
+10KHz – Jumps the radio up by 10 KHz
Hi-Cut (secondary) – Removes high end treble or hiss noise
COL – Allows you to select from 7 different colors or have the screeen rotate through the colors.
Time out transmit (secondary) – Feature to prevent radio from accidental transmitting
EMG – Selects channel 9 (in programming mode you can select whatever frequency you want)
S/RF (secondary) – Turns the S/RF meter on/off
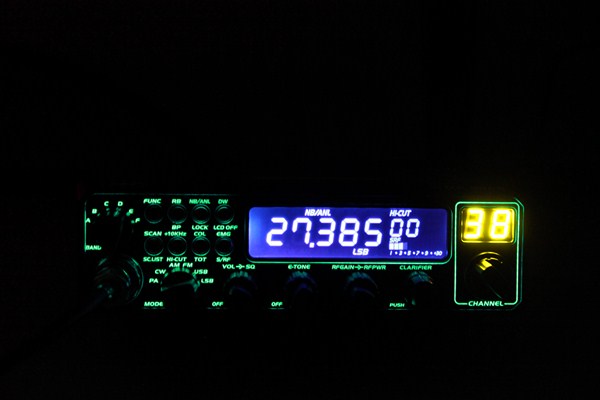
The radio features a backlit display around the controls and buttons. This type of illumination is useful in a night-time driving environment. The display is vivid and bright and with the ability to choose the LCD color you’re sure to find a setting/color you like. While the display was quite bright at night I found the numbers on the LCD a bit hard to read during the day, and in talking with Univercom I found out this has already been corrected at the factory and these radios will be using a brighter and easier to read display, which should help in bright sunlight situations.

The LCD display is the centerpiece around which you’ll be spending most of your time looking at the radio. It features a 7 digit frequency display. The display also shows a S/RF meter but this can be changed to show SWR by holding in the COL button for 3 seconds. The display also will show any of the features that you engage (NB/ANL, RB, etc….). It shows your mode of operation along the bottom.
MENU FUCTIONS
The CRE 8900 features a large number of options that can be accessed through the software menu built into the radio. It has some of the features we saw on the Anytone AT-5555/Alpha Max AM-1000 but it also sports some new features as well. We’ve listed the features below in short form, for more detailed explanations please read the manual
1) STP (Frequency Tuning Steps) – Change the tuning steps, options – 10HZ, 100HZ, 1KHz, 10KHz
2) Clarifier (RX, RX/TX, TX) – Change the way the clarifier works – adjust receive frequency only, adjust transmit and receive frequency simultaneously, adjust transmit frequency only.
3) PUSH (Clarifier Push Function) – Change what happens when you push the clarifier in, COA (change RX/TX freq), T (change TX freq), STP (change tuning step).
4) ASQ (Automatic Squelch Control) – Turns this function on or off
5) TOT (Transmitting Time Out Timer) – If you’ll be using the TOT function this allows you to set the number of seconds before the radio times out and stops transmit.
6) SC (Scanning Type) – Allows you to choose between two types of scan options. One that scans after a signal disappears for 5 secs and one that starts scanning after 5 secs whether the signal continues or not.
7) TSR (Transmitting SWR Protection) – Turn feature on/off. This feature will have the radio stop transmitting if the SWR goes above a certain ratio (factory setting is <10:1). You can change this value if you have the computer software.
8) TDC (Power Supplied Voltage Protection) – Turn feature on/off. This feature will tell you if your voltage goes too low or too high (factory defaults is 10.5V and 16V). If you are out of the normal range it will not transmit as well.
9) TLD (Display while transmitting) – This feature allows you to change what you see on the LCD when transmitting. You can choose between seeing the TX frequency, SWR (in numeric format), or Voltage.


10) RBF (Roger beep frequency) – You can adjust the tone of the roger beep with this feature hitch pitched or low pitched.
11) RBT (Roger Beep Time) – This feature allows you to change the length of your rogerbeep.
12) CFR (CW Side Tone Frequency) – You can pick the freq for your CW tone
13) TON (Transmitting SIngle Tone Freq) – You can pick the freq for your transmitting single tone
14) NOG (All Mode Talkback) – This allows you to turn on the talkback and adjust the volume level
15) CSV (CW VOlume) – Allows you to adjust the side voice CW volume
16) ICG (Microphone Gain) – You can adjust the microphone gain for the radio through the menu
17) BEU (Beep Volume) – When you have the beep enabled this adjusts the volume (BP function means every time you make a change to a control the radio beeps)
SOFTWARE PROGRAMMING
I’d love to be able to write a captivating paragraph on how to program the radio but I just don’t think it would make for very good reading so instead we’ve included a short video.
RECEIVE
The receive on the CRE 8900 is very sensitive, in fact it is probably a little overly sensitive. With the RF gain all the way up you’ll find you pick up quite a bit of static noise as well. I found that backing the RF gain down just slightly got rid of additional background noise while still allowing voice signals to come through.
The radio does a great job of receiving stations far and near and the tone quality is very crisp and clear.
One thing a lot of people disliked about the previous larger models (AT-5555, Alpha Max) was that they were prone to bleedover when strong stations were on adjacent channels. The CRE 8900 is very similar to those radios in this respect and strong stations on nearby frequency will cause bleedover on this radio. Adjacent channel rejection isn’t great, so if you live near where where truckers will be talking on AM all day, that’s something you might need to consider.
TRANSMIT
The CRE 8900 has a max output of around 40 watts. On AM with the variable in the full forward position the radio would key 8 watts and swing to 20 watts. On SSB the radio would peak between 35-40 watts. The variable control does allow you to adjust output in all modes.
This radio is not a big AM swinging radio. If you lower the deadkey down to 1 watt the radio will only swing to around 5 watts. If you are someone who runs an amplifier and talks AM all day most likely you’ll be looking for a radio with more swing than the CRE 8900. However, if you are someone who runs barefoot, or only uses your amp for SSB you might find the CRE 8900 fits the bill quite nicely.
Running this radio barefoot for 2 months I found I made contacts very easily on SSB. I also ran the radio with an amplifier on SSB and the radio drove the amplifier quite nicely.
AUDIO/MODULATION
The radio uses a microphone very similar to the Alpha MAX AM-1000, but the CRE 8900 seems to have more audio right out of the box. It also has the microphone gain adjustment in the menu functions. The microphone gain scale is 1-63 and from the factory the default is 31. I found I only needed to run the microphone gain at 20-25 for best results. The stock microphone is loud and offers a good sound although it is quite bassy which can make it sound a bit muffled. While driving around in the mobile I was told multiple times that it sounded like I was on a base radio with a desk microphone.
I was told over and over that the radio sounded loud and clear. Very clean sounding audio. I should point out that I did 99% of my talking on this radio on SSB. While I did spend one evening talking on AM with some locals and everyone thought the radio sounded good, SSB is really where the radio was getting compliments.
I found at highway speeds with the microphone gain set over 30 that the microphone picked up a lot of road noise so again it’s best not to crank the microphone gain.
UPDATE: 5/20/2012 – I found the stock microphone just picked up too much road noise and so I was experimenting with some noice canceling microphones but most of them just didn’t give much punch. Last week I wired up a Road Devil D104 and with the microphone power level set to 1/4 and the radio mic gain set to 31 I think I finally found the perfect match for this radio. Doesn’t pick up the road noise and gives a lot of punchy audio to the CRE 8900. Louder and punchier than the stock microphone and not so bassy. This is now my microphone of choice to run with this radio.
FREQUENCY STABILITY
This radio is very stable and doesn’t suffer from any noticeable frequency drift. I never had to adjust the clarifier and I found that much like the 2950DX series the radio was a joy to operate on SSB as I could feel assured it wasn’t drifting around on me.
A cool thing about these radios is you can actually make frequency adjustments through a back-end menu adjustment. Rather than having to go inside and turn a pot for adjustment you can go through a hidden back-end menu option to make adjustments.
INSIDE THE RADIO
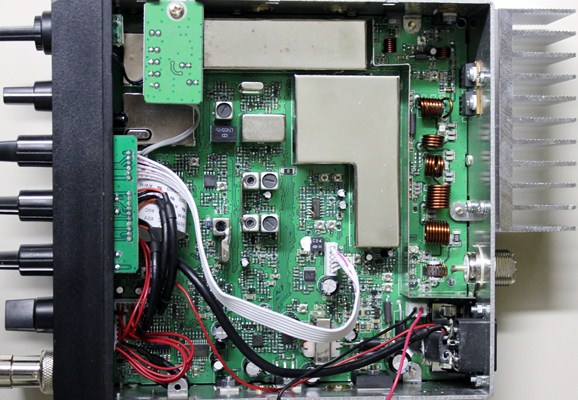
Once you remove the covers you’ll see that the inside of the radio uses SMT (surface mount technology). There are shielding covers over most of the key tuning sections of the radio and there are very few wires running around inside the radio.
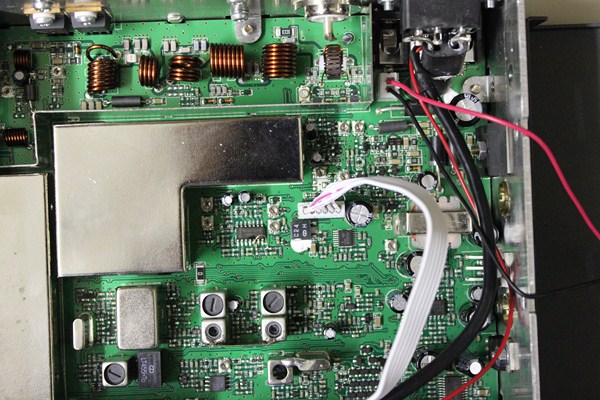
There are some adjustment pots inside the radio however they are not labeled, and much like the Alpha Max AM-1000 I recommend that unless you know what you are doing, don’t start messing around inside the radio.
Alignment Information Block Diagram Parts List PC Board Views Schematics Specifications
SUMMARY
This review has been updated – make sure to read the text in red at the end.
This radio is just starting to find its way into the homes of operators in Europe and from what I’ve heard, it should be available in the U.S. soon. Last year when I first got to test out the programmable features of the Alpha Max AM-1000 I thought to myself “these types of export radios are going to change things in the export market”. While the previous versions had their quirks (and this radio still suffers from some of those) the CRE 8900 is the next step forward in export radios.
The CRE 8900 is primarily going to appeal to the SSB operators and I think they’ll be happy in what they get. With the optional software you can really customize the frequency setup and ease of use. The addition of the microphone gain menu controls along with the variable talkback mean this radio has just about every feature an operator might need. The tuning options and clarifier options mean you don’t need to do any modifications because you can easily choose how you want the radio to operate.
This early version of the CRE 8900 that I’ve been testing has definitely impressed me, and while it isn’t a super swinging AM radio, SSB operators looking for a small rig with lots of options will be quite happy.
I’d give the CRE 8900 a solid 8 out of 10. I like the direction the hobby is going, and if these new digital radios with tons of options aren’t your cup of tea don’t worry, once we start seeing more of these types of radios on the market there will be plenty of the old drift prone chrome export radios showing up on eBay.
After using the CRE8900 heavily for over a year I had great reports on air right up until the radio started having software glitches and display issues. I talked to another owner who also reported the same problems. A hard reset fixed things for a short time but eventually the problems returned. At this time I would say the radio is not a great buy for long term use as it just didn’t hold up well over time. It was a great radio while it lasted but at $300 you’d expect it to last a but longer.
