Stryker SR-955HP 10 Meter SSB Export Review
The Stryker SR-955HP is a brand new radio released in May 2012. This radio has been a long time in the making and the first rumors we heard of the radio started over two years ago. Stryker spent a long time working with the factory to develop this radio and the goal was to create a SSB radio that would retain all of the positive aspects of their previous AM radios while offering SSB stability.
One of the biggest complaints about SSB export radios over the years has been issues with frequency drift during SSB operation. The Magnum 257, Optima, and RCI 29xx series have been some of the notable exceptions. The other complaint has been that often SSB export radios performed well on AM but not SSB or vice versa. The goal (at least as I had heard it) was to create a radio that could perform in all modes and offer the frequency stability that the die hard SSB crowd demanded.
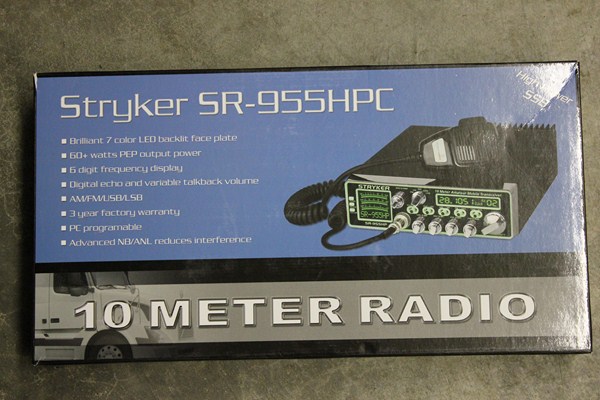
UNBOXING THE RADIO
The Stryker didn’t yield any surprises as I unboxed the radio. The radio came with a very basic-looking microphone, mounting bracket and hardware, power cord, and a nicely printed manual. However I did notice right away that there was no USB programming cable or software included with the radio. I placed a quick email to Stryker regarding this and they said this was a packing error on the first batch of radios and that subsequent radios will come with both in the box. Stryker sent out a cable promptly in the mail and emailed me the software. (The software can now be downloaded directly from their website).
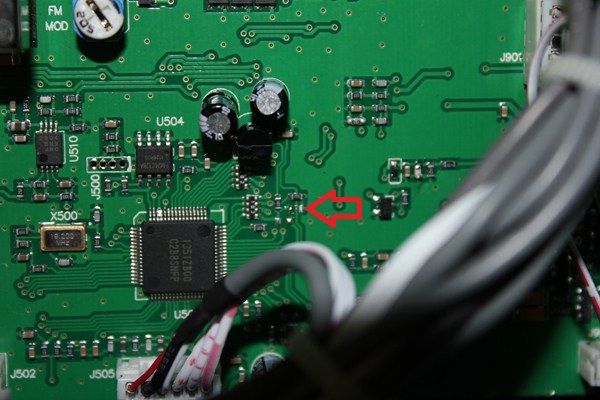
FREQUENCY CONVERSION
Converting the radio for expanded frequency operation requires the removal of a resistor so tiny it could fit under your fingernail. You have to de-solder this tiny resistor and it requires a very fine tip soldering iron and some expert eyesight. I wouldn’t suggest trying to remove this component unless you are fairly competent with a soldering iron or have experience working on radios with SMT (surface mount technology).
Prior to conversion the radio operates in a 10-meter-only mode (ham frequencies) but after conversion it has a frequency range of 24.000 MHz to 30.0150 MHz.
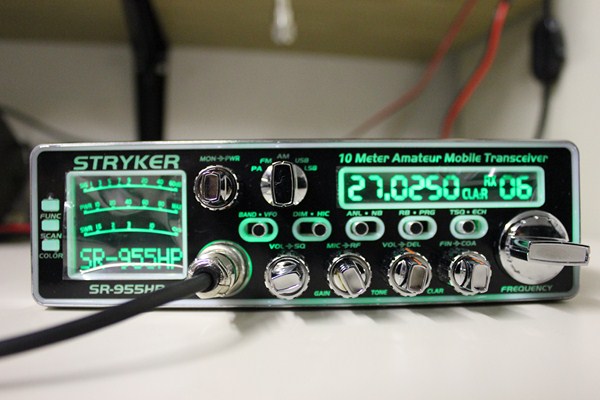
RADIO LIGHTING AND COLORS
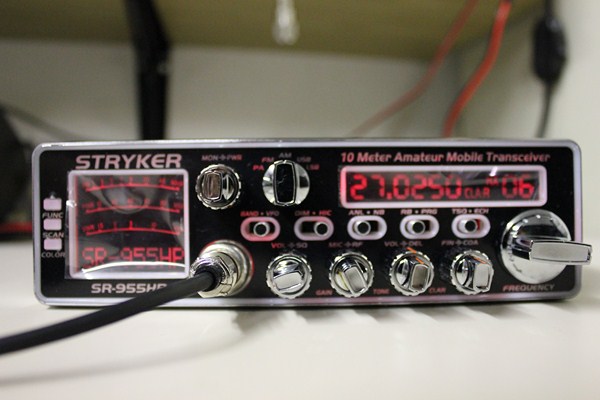
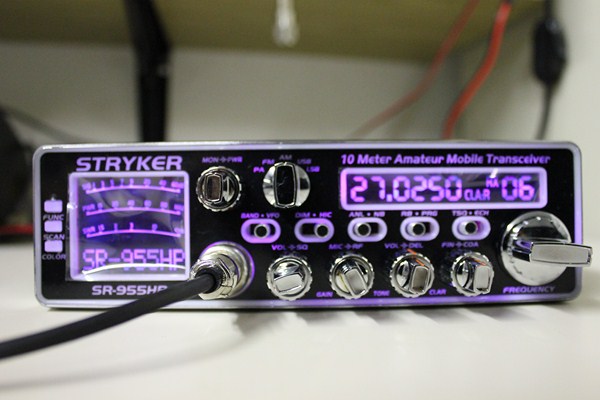
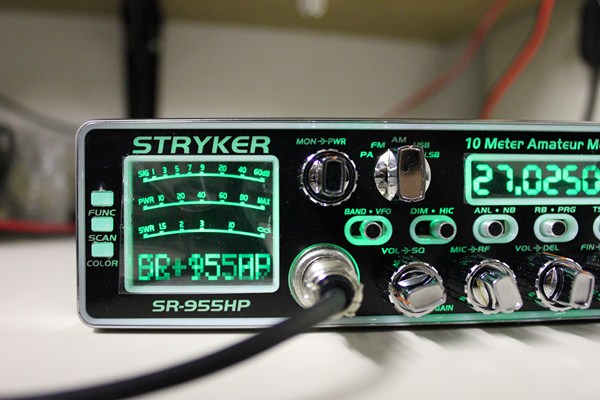
When you first power on the radio there is a two-second delay before anything happens (something I hadn’t seen with other radios). When the power comes on, though, you’ll know it, as the radio lights up quite brightly. That might be the most instantly visible feature of this radio – it’s strong backlighting and display. Initially it’s actually a little overpowering but luckily there is a dimming feature which we’ll discuss in a minute. All of the labeling on the radio is back-lit very well and so this radio is very easy to use at night. The radio also has lighting all the way around the front face of the radio. The frequency/channel display and the meter display are digital and the colors in those areas match the backlighting on the rest of the face.
There are seven colors to choose from: two greens, two blues, a purple, a red, and a bluish white color. Additionally, there is also an option for the radio to cycle through all of the colors in a sequence. You can even adjust the delay between colors in the rotation. I personally have never been interested in the light changing rotation aspect but I will say that this radio has some nice colors to choose from and it’s nice to see a radio where all of the coloring throughout the face is consistent.
As mentioned above, the color display is almost blinding at night at its highest level but luckily there is a dim switch on the radio. Moving the switch to the DIM position allows you to then turn the channel knob to select from 31 levels of dimming. You can set it anywhere between super bright and off.

CONTROLS AND FEATURES
Starting on the left side of the face of the radio you’ll find three buttons.
FUNC – This (function) button allows you to enter the function menu where they are multiple options available.
SCAN – Pressing this button enables the radio to scan through the frequencies until it encounters a signal strong enough to break the squelch.
COLOR – The button allows to to change the color of the display or set the radio to a sequenced change of colors.
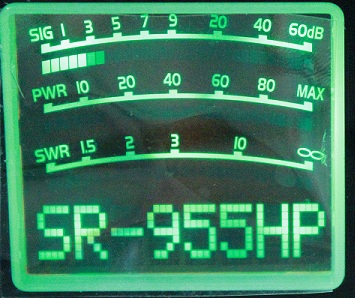
To the right of these three buttons is the digital meter. The meter displays three bar graphs simulataneously: Signal strength, Power output, and SWR. While the graphs themselves aren’t particularly large, it’s easy to see the movement even from further away and it’s very cool to be able to see your SWR and power output at the same time on an internal meter. The graphs are fairly accurate compared to other radios I’ve tested in the past with similar type displays.
To the right of the meter is the start of the knobs, switches, and microphone jack. This radio has a four-pin microphone jack that is front-facing, which means the radio may fit better in tight installs where a side microphone jack would cause problems.
MON/PWR – This is a dual control knob. On the inside is a variable talkback control. You can set the talkback anywhere you want or turn it off completely. The talkback works really well without being too loud. I did notice, however, that sometimes even with the talkback in the off position I was hearing some very faint talkback. I wasn’t sure if this was stray RF getting back into the speaker but it was a minor issue and barely noticeable.
The variable power is on the outside and again you can set it anywhere you like. The variable power works in all modes and in AM at its low position you’ll have a 1-2 watt carrier and in the high position a 15 watt carrier.
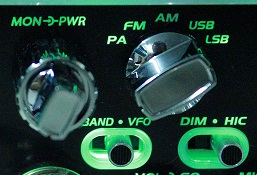
MODE SELECTOR – To the right of the MON/PWR control is your mode selector. You can choose from AM/FM/LSB/USB/PA modes.
BAND/VFO Switch – This switch allows the radio to operate in a “band” mode (similar to other Export radios) or it can operate in a “VFO” mode where you can tune continously through the frequency range of the radio.
DIM/HIC Switch – This switch allows you to dim the display. In the DIM position a menu option will appear and by turning the channel changing knob you can select the desired level of dimming. The HIC is a “hi-cut” feature and will cut out a lot of the high frequency hiss and noise.
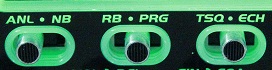
ANL/NB – The switch allows you to enable the ANL (Automatic Noise Limiter) or NB (Noise Blanker). In the ANL position it will do the ANL but in the NB position it will activate both.
RB/PRG – In the RB position the “roger beep” is on. In the PRG position you can program the type of roger beep from five options and you can also add or delete channels from the scan mode.
TSQ/ECH – The TSQ option would be used to activate a CTCSS board but since one is not installed this position doesn’t do anything. The ECH is the echo option and when the switch is moved to this positon the echo is enabled. You still have to set the echo options using the echo knob controls.
VOL/SQ – Volume (on/off control) is the inside knob. Squelch is on the outside.
MIC/RF – Microphone gain control is on the inside knob. RF gain adjustment is on the outside.
VOL/DEL – Volume of echo effects is on the inside knob. Echo delay is on the outside.
FIN/COA – Fine clarifier control is on the inside knob. Coarse clarifier control is on the outside.
FREQ – Changes frequency and also options in menu modes.
MENU OPTIONS
I’m not going to go through all of the menu options on this radio as they are very similar to the Alpha max and CRE 8900, but I will touch on a couple of them. You can read through the Manual for all of the info. I also go through all of these options in detail on my online video overview
FIN/COA – these two menu modes allow you to change the range of the clarifier control. This allows the clarifiers to tune in different increments.
FinM – You can have the fine clarifier adj RX, TX or both.
CHS – This option allows you to change your channel steps
PROGRAMMING OPTIONS
Scan – Allows you to add or delete frequencies from the scanning function.
RB – Allows you to choose between the different roger beeps.
SOFTWARE OPTIONS
Again, I’m not going to go through all of the software options because the software is very similar to the CRE 8900 software and I posted a video online showing the software
The main feature that’s different in this radio’s software is the ability to modify the roger beeps for length, pitch, and number of beeps. If you’re into roger beeps this is actually a pretty cool way to customize your beeps.
I will mention that I tried to get the radio to talk with the software and was unable to do so – I thought this was because my computer was having some issues at the time. A friend of mine (who now owns this particular radio) at a later date also tried to connect with the software and ran into the same issue. I’m not sure if this was a problem with the software or the radio being a first run. I’d actually like to hear from some other users at this point if they’ve gotten the software to work so I can post up the results.
SOFTWARE UPDATE INFO – I received the great email below from one of our readers that may be helpful for those running into software programming issues.
Hello,
I saw that you were looking for some feedback on the Stryker SR-955 USB data cable. I too purchased a new Stryker SR-955 after owning several Stryker radios. I also received my new SR-955 radio without the factory proprietary USB data cable. After months of frustrating attempts at getting the radio to communicate to a PC with standard USB cables, I contacted Stryker and was told of the mistaken lack of inclusion of the factory USB cable. They sent one out quickly and I was able to finally connect the radio to my PC.
I can see why some are having difficulty in connecting the radio to a PC due to the complexity of downloading and implementing the “zipped” software from the Stryker web site. Once downloaded from the site the software needs to be “un-zipped” so you will need a “zip” software. Once un-zipped you need to determine what operating system your PC is utilizing and then select and install the appropriate type of driver from the list of “PL-2300 drivers”. So if your PC is running Vista, install the Vista driver, Windows 7… install the windows 7 driver and if your still running XP install the driver with no association listed. I mentioned to Stryker that the included instructions to properly load the software were very vague. After setting up the software and installing the USB cable into the PC, I went into the Stryker software setup tab and set the communications port to Com 4. Then with the PC on, Stryker software running and USB cable connected to radio with the power off first, turn the radio on. There may be some variations to the set up on different PC’s but this is how I got it to work.
There was great fun in generating my own rodger beeps up to 14 tones long with any note between 400-2550 Hz in the software. I made some short versions of some popular movie themes and songs. What an awesome radio the Stryker SR-955 is. Sure it’s pricy but you get what you pay for here. Great “Studio Quality” audio reports with this rig and a Turner +2 SSB desk mic. After reading your thoughtful review, I’m going to try the factory mic too. When I asked them directly “what happened to the “Stryker” mic?” they said the new mic was an improvement over the previous mics even though it had a basic look to it.
We have a good base of 11 meter operators in the S.E. Pa area still interested in vintage CB radios and, like me, ones that are very interested in the new feature laden and software driven rigs. Please keep up the great reviews, we really appreciate it.
Sincerely,
Sparky 775
RECEIVE
The receive on the Stryker is excellent, however it does have quite a bit of background noise similar to the Alpha Max and CRE 8900. The new radios with these newer style boards seem to have an oversensitive receive, so running the RF gain at about 3/4 almost becomes the norm. They easily pick up electrical interference so if you live near neon signs, lots of power lines etc you may hear more noise in these radio vs an older Cobra 148, etc. These radios are also prone to bleedover so if you have high power stations nearby or are a truck driver that’s something to consider.
The SSB receive is great and with no drift after a one minute warmup the radio stays on frequency and stations sound natural through the speaker.
TRANSMIT
The Stryker 955HP has great output: 75-85 watts on SSB and around 65 watts on AM. The radio stays on frequency even during long conversations. The heat sink will get quite warm but I didn’t notice any stability issues and only very limited drop-off in wattage when the radio got hot.
AUDIO/MODULATION
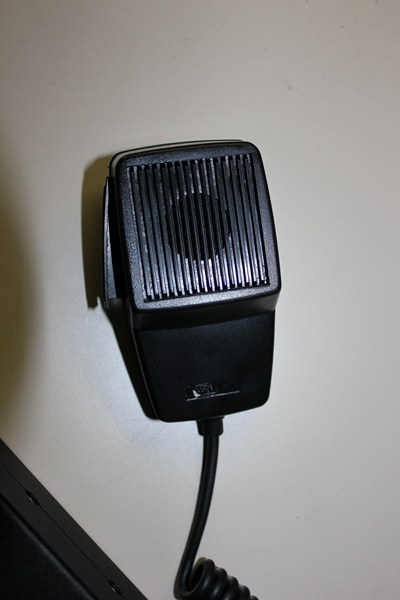
The stock microphone on this radio is king. I tried a variety of microphones and everyone said to put the stock microphone back on the radio. It’s a cheap-feeling microphone but the audio reports were glowing. I got a ton of positive feedback on the air and people asking again and again what kind of radio I was using.
AM audio was good – not quite as screamingly loud as some of the other Strykers I’ve used but definitely better than many of the SSB exports I’ve used. On SSB this thing flat-out rocked the airwaves. SSB audio was punchy, crisp, loud, clean and natural sounding. When I recorded myself on the air I was pretty amazed at how nice this radio sounded.
FREQUENCY STABILITY
This radio is very stable and doesn’t suffer from any noticeable frequency drift during operation. I noticed a very slight amount during warm up (1-2 mins) but after that it did not move at all. RX and TX were right on and I didn’t have to make any adjustments in all my testing.
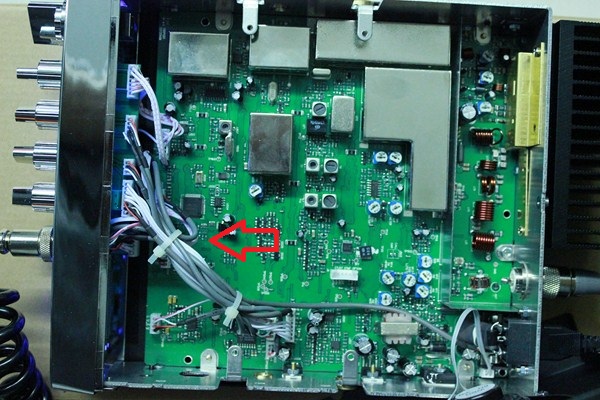
INSIDE THE RADIO
Once you remove the covers you’ll see that the inside of the radio uses SMT (surface mount technology). The pots inside the radio are all labeled so you can easily see the adjustment points. However this radio needs very little tuning (if any) to sound excellent on the air. Adjustments inside can increase your output a bit but you won’t find huge changes in audio. It can use a small adjustment out of the box to get the SSB output up to the 70-80 watt mark and to get the AM swing going just a bit more but for the most part you really shouldn’t need to touch much inside this radio.
Out of the box no tuning or alignment is really necessary so no need to pay for an “alignment” from a CB shop. A good tech can make some adjustments to the power and audio for higher output and more swing if you don’t feel comfortable doing them yourself.
SUMMARY
Instead of my typical summary I decided to write up the PROS and CONS of this radio mainly to emphasize where I thought this radio did superbly and where it was lacking. Normally I don’t do this but the radio really tore me in two directions and so I think the two sections below will really explain.
PROS
SSB Stability – People have been complaining for years about the lack of frequency stability on export radios (with the exception of the 2950DX, Magnum 257 and a few others). Generally speaking the export market has had a ton of radios that were loud on AM and okay on SSB but would drift all over the place. The new technology being used on the Stryker 955HP has produced a radio that has so little drift it is a non-issue and that is a big deal for SSB operators who use export radios.
Output – For most people using this radio on SSB you won’t need a linear. We know that you can talk around the world on twelve watts but we also know that 100 watts or so is an ideal number for making more consistent SSB contacts. This radio on SSB will tune up to around 85+ watts (I’ve heard higher numbers around 100 watts are possible but I didn’t see them personally). Those output numbers mean this is a great barefoot SSB rig for the operator who doesn’t want to use a linear amplifier. Output is consistent and smooth in delivery and while AM output wasn’t hitting nearly the same numbers as SSB in my testing, it also should be enough for most local talking and even some DX.
Controls and Design – While many new radios tend to baffle some of the less technical crowd with menu functions and software programming, the Stryker radio tried to remain true to its roots. So while the radio can be programmed and also has options through the menu function, the face of the radio is still very similar to older exports. The controls on the face are easy to use and the design is still for the CB’er at heart, so the radio gets a thumbs up for appealing to old school while incorporating the new school.
Microphone – Very rarely is the stock microphone the best option for any radio but in my testing with various microphones it got the highest marks. So congratulations to Stryker on figuring out how to make a stock mike sound better on their radio than any of my power mikes or desk mikes.
Audio – AM and SSB audio on this radio are pretty awesome. They have made a radio that out-talks just about all others in the export market. Seriously it does sound that good on the air. Loud, clean, and punchy audio that sounds very natural. In my testing with this radio I got a ton of great on-the-air SSB feedback and people said it sounded better than my CRE 8900, 2950DX, or Uniden 980. From what I’ve read on forums other people are also hearing these radios on the air and are commenting on how nice they sound. (Disclaimer – I make no claims as to how these radios will sound with the modulation cranked, a power mike added, or after a golden screwdriver has been inside). 🙂
CONS
Tuning Steps – This radio nailed the “export market user” so well in so many areas but in one area they missed the boat and this was the tuning. For someone who uses their exports radios for a lot of 10 meter use I found this radio a bit difficult for use. To access the tuning steps you have to go into the menu using the function button and then set the steps for tuning and then leave the menu mode. The 2950DX, Omegaforce and CRE 8900 are much easier to use in this respect. With those other radios you can easily change the tuning steps quickly from the face of the radio with the push of a button or a knob and I found myself missing that option during operation of the Stryker. It also lacks the easy split operation of the 2950DX.
Oversensitive Receive – While the receive on this radio is excellent is also has some of the same issues the CRE 8900 and Alpha Max have regarding receivers that pick up a lot of extra noise. You’ll find yourself running the radio with the RF gain turned down and in the city or areas with lots of electrical noise you’ll find the problem even worse. Bleedover is also an issue with these radios so you may find problems with nearby AM’ers bleeding through on SSB. I think if you live in a city or drive through a downtown everyday it’s definitely something to consider. If you live in a location where you are already having problems with noisy receive on something like a Cobra 2000, you will not be improving your situation with this radio.
Price – This radio is expensive, hitting the $379-399 mark depending on where you buy. For $400 you can pick up a used Icom-718, so I think Stryker is really hoping the hard core export radio market won’t mind paying the premium price for a radio with all of these options.
FINAL THOUGHTS
Stryker did something unique with this radio and they did so by listening to their customer base. The radio was a long time coming but they were able to blend the ease of use and features of the older export radios with the increased power, software options and frequency stability of the newer radios.
Some people have complained that the different roger beeps, echo and colors make this radio more of a trucker radio than a serious SSB radio but Stryker knows their customers and they needed to include the right functions for this radio to appeal to a large market of users. The SSB audio on this radio sounds better than most exports I’ve ever tested and even better than some of my Ham rigs, so I would say it definitely has the potential to be a serious SSB rig.
In the end I am inclined to bring up the adage that there is no such thing as a perfect radio for everyone, but for many export radio fans, if this radio is in their price range, they are sure to enjoy the strong output and clean SSB audio.
PROGRAMMING UPDATE FROM ONE OF OUR READERS
Just letting you all know I could not get my Windows 7-64 bit laptop to see the Stryker supplied USB cable.
I did alot of web searching and came across this fix, which worked for me.
It seems the drivers for Windows Vista are the ones needed for the device manager to see the USB cable.
There is the link:
http://www.miklor.com/uv5r/UV5R-Drivers.html